Search This Blog

Monday, June 24, 2013

New Handmade Items


I added five new items at Pompom Sweets ! All of them are dust plugs. 


I really like how I made the cereals. Instead of portraying few pieces of cereal in milk, I decided to make them look like they're overflowing. Doing this would make them look fuller and more attracting (like in cereal ads!). I always aim for realism so I detailed them the best I could. I also made the bowls myself. I could have added spoons in each bowl but I was certain that if it was used daily as a dust plug, it would break off. 


Next are my cake slices. I was waiting for my dollhouse plates to come in the mail so I can make molds out of them! I think the plates came out good. I glazed it to make it resemble ceramic. What was really annoying when making these charms was the icing. When uncured, it can get very messy and sticky. Also, these are the tiniest fake cakes that I've ever made.

I love making miniatures and I'm not so sure why. The first time I knew about miniature food was when I was browsing through Etsy. I was totally attracted to them! I'm so glad that I am able to make my own foods and share my creations with others. :)

❤Nicole Vong


Friday, June 21, 2013

My First Instagram Video


Purchase the earrings and necklace here.

In my short video, I showcase my Boo earrings and King Boo Necklace! You can see how cute and small they are. They glow in the dark as well!

I felt a bit awkward recording a video because I haven't made one in soo long. After making this, I realized it's very fun! I have a Vine too, but their app on the Android isn't as good as Instagram's. You can redo parts of the video without having to start from scratch. Plus, Instagram has effects unlike Vine!

I was pretty amazed by the quality of my phone's video capture. I also noticed how super low and monotone my voice was, I need to fix that next time. The strange thing is, I don't like the sound of my voice when it gets recorded because it always sounds childish, but this video makes me think otherwise! 

❤Nicole Vong

Thursday, June 20, 2013

My Polymer Clay Essentials


I have five very essential tools that I like using when I am working with polymer clay. They are versatile and inexpensive! I'll tell you what I use them for and how they are effective so that you can get more ideas!

1) Paper Towels: This certainly seems like common sense, but it really is a useful tool. I use mostly for wiping down my table and cleaning my brushes. To conserve it, I always break the towels in smaller pieces. Another use is if you're painting clay with acrylic paint and made a mistake, you can simply add water to the paper towel and wipe it off! One more trick is if you're trying to paint a whole piece of clay (works better with round or cube shaped clays) with one color, add a few drops of acrylic paint onto the paper towel, fold it in half to spread the color, and put your piece inside. Move the clay around so it will absorb the color from the towel. In that way, the paint will get on pretty quick!

2) Rubbing Alcohol: This is my most favorite cleaner ever! There are always other cleaners like baby wipes and hand sanitizers, but rubbing alcohol can take out any tough stain and leave my work place spotless (clay friendly surfaces). It works on resin, paints, glues, excess clay, etc.! It does an okay job with cleaning your hands. Alcohol also helps remove unwanted paint, dust and dirt on uncured clay, but it also removes some of its pigment so be careful.

3) Aluminum Foil: This has so many uses and it's so affordable! You can use it for curing the clay in the oven so it won't get burned. It is also good for storing uncured clay if you want to keep your clays separate. Because of its bendable attributes and rugged surface, it's good to use for texturing. It is also good for making armatures of course! 

4) Vegetable Oil: Practically any oil can work, but vegetable oil is cheapest and sells in gallons! :) Instead of using Sculpey's clay softener or TLS, oil works just as fine. To make fake icing, you can add oil to dry clay then mix it with TLS. Don't put too much oil though or the clay will get very loose. Since I work with miniatures, I use 1 drop. I store oil in a plastic shot cup like in the picture. 

5) Box Cutters/Razor blades: Every polymer clay artist needs this unless you're a child. It is perfect for slicing even pieces of clay and it has high precision such as shaving off the clay slightly to remove its unwanted colors. Not only do I use it for that, but I also use it to remove stains on my work surface by simply scraping it. As you can see in the photo, I have a ton of them! Yet, I've only used three of them haha.

Bonus: Tweezers! They are so perfect for removing the tiniest dust particles that got stuck into the clay without ruining your piece. I sometimes use them for making bottle charms to add the contents inside.

So these are the useful tools that I have when working with polymer clay! I hoped my tips will help with your creations! :)

❤Nicole Vong


Wednesday, June 19, 2013

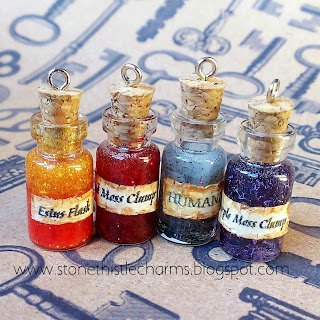
New Items: Dark Souls Potion Bottle Necklaces


Purchase these necklaces here
Tutorial for how to make the labels is here

Wow, these took me some time to make! I was experimenting a lot with resin and I tried to make different effects. I think these came out pretty cool! It was a lot of hard work... I used several different materials and mixed a lot!

I was inspired by a video game called Dark Souls which is a really good RPG because it's so challenging and different from other video games today. It's pretty much my most favorite game for the Xbox 360 and maybe its because it has horror elements blended into fantasy. I am very late because this game was released in 2011! Anyway these potions that I made resemble the consumable items within the game. Estus Flasks are for replenishing health, Red Moss Clumps are for reducing the effects of bleed, Humanity is for becoming human (lol), and Purple Moss Clumps are for reducing the effects of poison. Sorry for overloading you with geekiness.


The Moss Clump potions have actual moss in them! However they don't really look like moss but rather like arteries and bolts lightning (which is totally awesome). My favorite potion is the Humanity one because I achieved the ghostly effect I wanted! These pictures are high quality, but these bottles look way better in real life and they glimmer more!


Yup, these bottles are pretty small, but the smaller the cuter!

❤Nicole Vong

Monday, June 17, 2013

Chocolate Cake Slice with Cherries


I made this a while ago. It was my first chocolate cake that I cut into slices. I didn't like it too much because it kind of looks plain, haha. What I liked though was the added effect of "juicy" looking cherries. I used a red craft glue that first looks opaque but then it turns jelly clear. The patterned rim of the slices were pretty hard to achieve because I was working with very soft clay.  I tried to achieve some sort of elegance to the slices. The white whipped cream was added on to make the slices more interesting (but it's still meh).


Usually when I am making something new out of clay, I always take so much time, like on these slices! I like to work on my own pace but it's so bad that I feel like I'm not progressing. I think conditioning the clay and mixing colors take up most of my time.

I'm going to make more cakes in the near future, so stay tuned!

❤Nicole Vong

First Entry/Bottle Label Tutorial

Hello! I'm new here on Blogger and I decided to make a blog to display my creations and go into detail about them :) I also currently own two shops on Storenvy and you can find them on the right side of my blog! I sell handmade jewelry, mostly made out of polymer clay. So expect to see a lot of miniature foods and other miniature stuff. :D

So for my first blog post, I want to show you a tutorial I made! It is on how to make an antique label for fantasy bottles. It will be a great addition for any potion/spells that you're making! 


I originally posted this on Instagram, but whenever I upload my photos to that app, the quality goes down. This picture should be a lot more clear!

Steps:

① On a word processor, type the name of the label that you want. My font was 9pt or 8pt. Print it out then cut it to make a rectangle. It doesn't have to be perfect. I am showing how my label would fit on my bottle. 

② Make some cuts along the edges of the label. Try to make it random or else it will look like its been patterned. 

③&④ Crumple your label! Try not to rip it. Open it up and you'll notice the effects of its "aging". 

⑤&⑥ Use a *thin* layer of glue to coat the back of the label. I'm using tacky glue. Apply the label onto the bottle and make sure it's not slanted! 

⑦&⑧ Get yellow and brown acrylic paint and make one drop of each on your palette. Mix some yellow with a hint of brown along with a few drops of water. Paint all over your label. If it gets too yellow, even it out with a wet brush. Don't use too much water on the label! 

⑨ Get some watered brown on your brush and paint only the sides. Then make your brush dry and get brown paint. Lightly go over the edges and cuts in thin lines to make them darker. 

⑩&⑪ Use your nails to push parts of the edges inward or apart from your cuts. This will make the label look more crumply. In the photo, I'm using my thumb to push the edges up.

 ⑫ Wait for your label to dry. Then thinly coat it with a glaze. You are finished!!!

I hope you liked my tutorial! Maybe I will make more in the future.

❤Nicole Vong